
Greetings, my fellow hiker! Today, I'm excited to share with you an incredible hike I took just north of Sedona, Arizona, where you'll get some unbelievable views of the red rocks that make Sedona so famous!
Hi, I'm Brice, president of Vaucluse, where we love to sweat less and explore more, plus hike more and just be outdoors more (while sweating a whole lot less). Today, I'm going to be sharing with you my incredible hike up Steamboat Rock, which is just north of Sedona and where you're going to get some fantastic views. It's not that long of a hike but – I have to warn you – it is not a hike for everybody!
Now usually, what I'm trying to do is introduce you to hikes that everybody can do quite easily. On this one, however, I'm still going to be sharing with you the trails that I took and the views that I found. It will be the usual walk-through, so you can see for yourself if it's something that you want to do, but most importantly, will this be something that you will want to do?
Hiking Trail Review - Steamboat Rock - Sedona, Arizona
Hiking is not just seeing great views. It's being able to understand what your limits are and, I have to say, if you're not an expert over this kind of terrain, the rocks out here can get quite slippery. It might get a little dangerous and obviously, sometimes it gets pretty hot.
Now, in my case, today wasn't that hot at first. Let me walk you through specifically where we were:
This trail is just a few minutes outside of Sedona, in northern Arizona (about 45 minutes south of Flagstaff and a little over 90 minutes north of Phoenix). We are in the Coconino National Forest, which is the big forest around here and you just take the 89 A up north and, once you pass the Midget Lea Bridge, there is going to be a trailhead called Wilson Mountain Trailhead and that's where you can park your car. I recommend getting there early. Like most places it fills up quickly. There is another spot, on the south side of the bridge where you can also park your car, but I parked here at Wilson Mountain Trailhead. I would say there's 30 spots for cars, so it's kind of small, you’ve got to get here early.
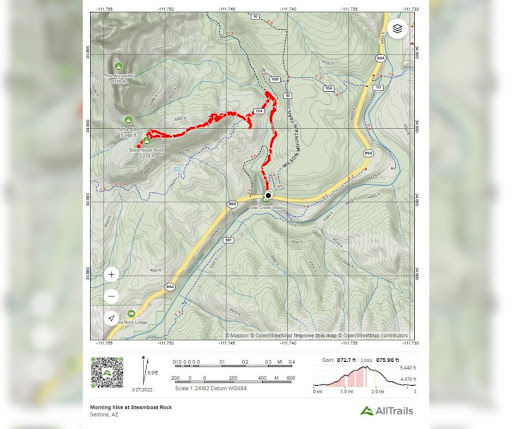
I took three trails: the Wilson Canyon Trail, the Jim Thompson Trail and an unmarked trail that got me the rest of the way. Let me walk you through each one of these trails:
Start with the Wilson Canyon Trail. (View the trail details here.) A very, very simple trail. Anyone can do this trail. Not a problem. Plus, there are a few options. You don't have to continue to go up (as I'm going to do; anyone can definitely do this trail. The second is the Jim Thompson Trai, where you start climbing up relatively soon, but it's still pretty easy. This part, you or anyone can do, and then there is a section that goes around Steamboat Rock (that you wouldn’t have to take). That’s what I'm going to be hiking.
Continue on the Jim Thompson Trail, (View the trail details here.) and you're going to be perfectly fine. You're going to get some pretty good views but… you're not going to get the views that I'm going to show you in just a second!
The third trail is unmarked but it is a trail. I didn't go off and do my own thing – I highly advise never doing that! I saw a tarantula on this part of the trail (you know they're not dangerous, just don't bother them). It wouldn't surprise me if there were snakes. Anyways, it's like any unfamiliar place: This isn’t Star Trek, you don’t want to go where no one else has gone.
There is definitely a trail, so if you go to my trails link below, you can find out how I got to the top, but it does get a little difficult. You have to climb on all fours probably 2-3 times. So it's not the easiest and the reason you have to climb like that two or three times is because of the rocks. The red rocks. They just start becoming really big, and you literally have to climb on these big rocks. I wouldn't consider it mountain climbing, but you do have to climb on them, and you go up and eventually, you get some really, really stunning views.
The total elevation gain was practically 1000 ft. So if you are not in good shape, this might be pretty difficult. Even for me it's a bit of a challenge. The distance was just under four miles. That's going all the way to the top and then coming down. Total hiking time was two hours, 45 minutes. There were several pauses, just to take a break to talk, take some photos. So the moving time was about two hours. That was an hour and 25 minutes to go up and then 40 minutes to come back down.
Overall, again, this was a really good hike. Great views if you can do it, If you can't do it, there are plenty of other trails surrounding Steamboat Rock that will also give you some terrific views. This is a great section to hike in Sedona, because it's not going to be as packed with other hikers as some other places. For example, Cathedral Rock can get quite busy, as can Bell Rock. So this trail is really good.

Backpack Airflow System - Sweat Less in Arizona Heat
When I started this video, I said I was the president of Vaucluse, where we love to sweat less and explore more and the reason I say that is because I took with me my Vaucluse Cool-Dry Backpack Frame, which I have attached to my Osprey 2- liter.
What the Cool-Dry Frame does is it attaches to any backpack (it's a dual frame) and what it allows you to do is to keep a breathable space between your back and your backpack. And it weighs only about six ounces, compared to other products on the market that tend to weigh two, maybe three times more. Some frames easily weigh 15 to 20 ounces. So this is very lightweight.
Even if you don't have a frame in your backpack, this is ideal because you can go from a no-frame backpack to attaching this, and all of a sudden you have space (!!) between you and your backpack. As air flows through, heat dissipates, and the sweat evaporates.
Sweating does you no good when it comes to cooling down your core. Sweat needs to evaporate, and so this is what the Cool-Dry Frame does. It works really well out here in Sedona because it allows my body temperature to stay cool. When I'm climbing those rocks in the Sedona sun and it’s in the 70ºs, with humidity around 40%, it doesn't feel too hot. But when the sun starts cranking up, every 30 minutes gets hotter and harder, so it’s nice to have something that allows air to flow across my back.
When you're looking to stay cooler while you hike, sweat less (and protect your backpack too),be more comfortable, and have a better experience hiking, check out my Vaucluse Cool-Dry Backpack Frame. The link is right here.
See you on the trails!
- Weather - Sunny with zero cloud cover. (Full overview)
- Time on trail: 2h47
- Distance around 3.78 miles.
- Elevation gain was 984 feet.
Strava Tracking: You can review the hike's stats on my Strava account by clicking here.
AllTrails Tracking: You can review the trail on my AllTrails account by clicking here.


